Photoshop Tutorials, Flash Tutorials, 3Ds Studio Max Tutorials, Web Design Tutorials |
Home | Submit Tutorial | Top Sites | Free Templates (NEW) | Website templates | Privacy Policy | Link Exchange | Contact Us |
|
Welcome To ProDesignHost.com 3D Graphics Tutorials Area - Creating An Animated Camp Fire - Software: Cinema 4D3D Graphics Tutorial - Creating An Animated Camp Fire
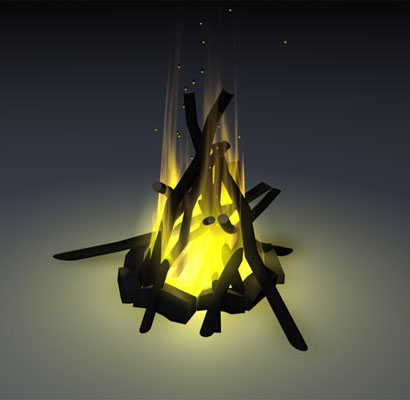 I was wondering how to make an animated camp fire the other day, so I had a play around and figured it out and I saved off pics as I went along and wrote this, I hope you find it useful! The image above shows the kinda thing you can create and animate quite easily in Cinema 4D!
OK first things first we make a stick! 1. Create a Cylinder and set 2. Height segments to 6 and rotation segments to 12, 3. sep cap segments to 1 so we have a fairly low detail cylinder 4. MAKE EDITABLE, also drop in a FLOOR object.
1. go into POINT MODE and 2. Using the select/move/scale/rotate tools bend and twist the cylinder into a log type shape as shown
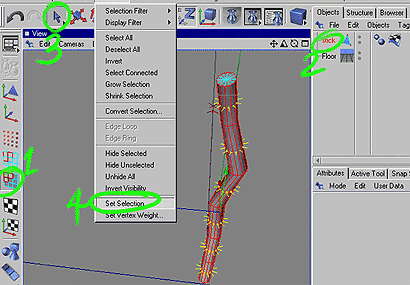
Now we want to apply bark to the outer parts and light wood to the ends! 1. go into FACE MODE and 2. making sure the STICK object is selected select all faces EXCEPT the end ones as shown, 3. Using the select tool. Now goto SELECTION=>SET SELECTION
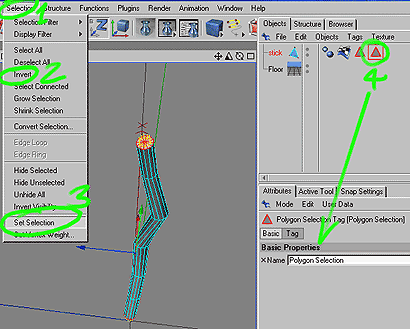
1. Now click SELECTION 2. INVERT and 3. SET SELECTION again and 4. we have two selection TAGS added to the stick, one for the bark and one for the ends! They are currently called "Polygon Selection" in te next part we will give them a more useful name.
1. OK DOUBLE CLICK the 1st selection tag and 2. give it the name "Stick" 3. DOUBLE CLICK the second tag and name it "ends" in a minute we will use these names to apply the materials to the right parts!
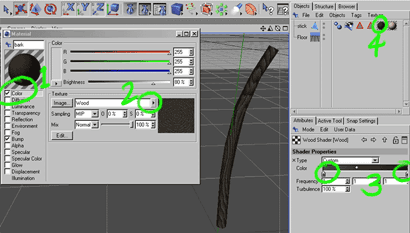
1. Create a new material and in the COLOR channel, 2. Choose the WOOD shader and 3. Change it to a dark brown and black texture (also copy this into the BUMP channel) and 4. Drag and drop this material onto the stick object.
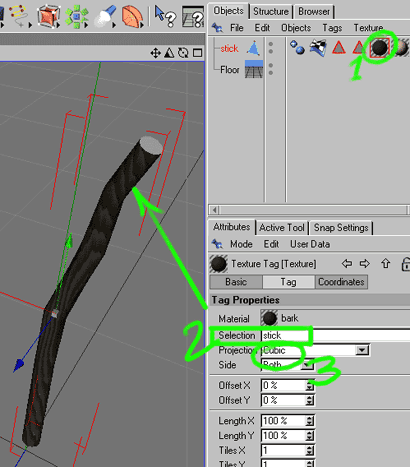
1. Click the material assigned to the stick and 2. in the SELECTION box type "stick" this limits the material to the selection we specified earlier and 3. change it to CUBIC mapping.
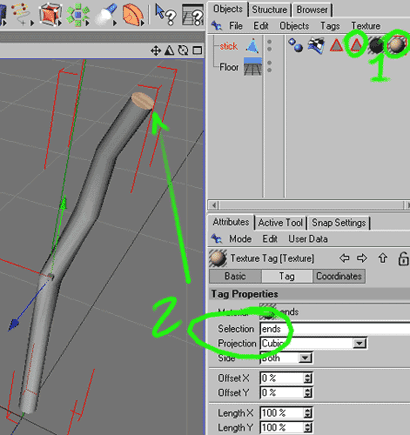
1. Copy/paste the material and change the new one to a lighter wood and drag and drop this onto the stick object 2. Type "ends" into the SELECTION box and choose cubic, this limits the light wood to the end faces we selected and SET before.
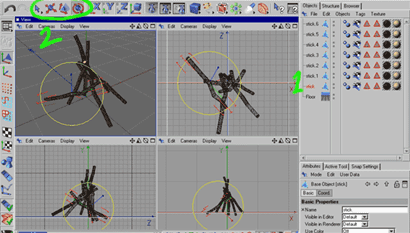
1. Click the stick object and press CTRL+C and then CTRL+V to paste a copy, do this 5-8 times, 2. Use the select, move, rotate and scale tools to create various sizes and positions with the new copies aiming for a pyramid type shape.
Make a load more copies, scale and rotate em etc to form the firewood, 1. Drag a box around them all as shown and RIGHT-CLICK and Choose GROUP OBJECTS or press G to group, rename the group "Sticks"
It needs some bricks so 1. create a cube, subdivide it and pull its points around a bit to make it irregular 2. Create a material and 2. Choose a dark colour and 3. Choose a noise as the bump map to give it a bit of texture.
Copy and paste the brick 8-12 times and move/rotate it to form a ring around the base of the fire as shown. Select all the bricks and press "G" to group em, rename em "bricks"!
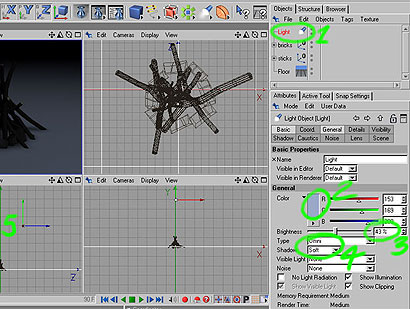
1. Now for some lighting, create a light and 2. Choose a light blue colour 3. set its brightness to about 40% and 4. set it to "OMNI" set the shadows to "SOFT" 5. position the light high above and off to one side as shown, this is to simulate a kinda dark night-time lighting that the fire will light up...
Now for the fire light, 1. Create a light and name it "firelight" 2. Choose a bright yellow colour, 3. Choose "OMNI"...NO SHADOWS (try turning them on later)...and set visible light to "VISIBLE" and also in the DETAILS section set FALLOFF to LINEAR. 5. Scale the Visible light to fit the middle of the fire and 6. scale the FALLOFF to about 2 or 3 times the fire size, this is how far the light goes. As with everything these settings may need to be tweaked to suit your situation.
Ok now to create the actual flames, we start by creating a CYLINDER and scaling IN the top points to create an almost cone shape, the bottom should roughly fit the base of the fire!
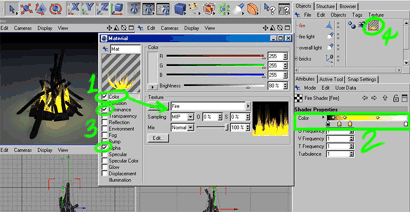
Create another new material and 1. in the Color channel choose the FIRE shader, 2. Set it as shown to go from black to orange to yellow then to white, these settings can create different types of fire etc so experiment with them!! 3, After you get a color you like copy it into the LUMINANCE channel and the ALPHA channel now 4. Drop this onto the fire object we just created.
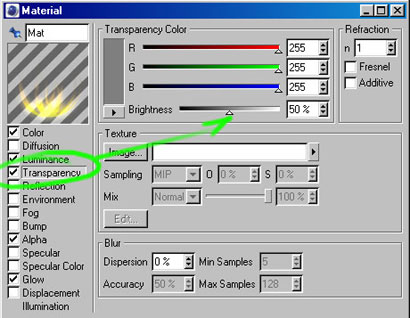
After a quick render it needs tweaking so we set the Transparency to about 50% or something like that.....
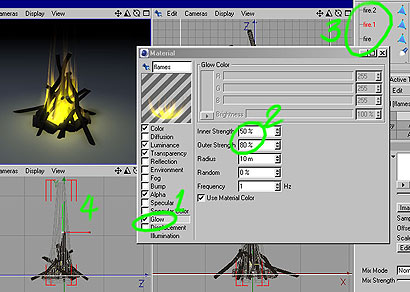
..and 1. turn on GLOW 2. set to 50% - 80% or higher if you want a denser glow, again its time to experiment!! 3. We make several copies of the fire object and 4. Scale them to various sizes, rotate them various amounts etc so the flames aren't all IN-LINE and the SAME SIZE! The beauty of the Flame shader is its already animated but we will be controlling it a little...read on...
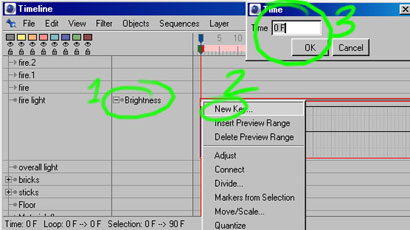
OK First we are going to animate the firelights' brightness, 1. press SHIFT+F3 to bring up the timeline, 2. Select the firelight and NEW TRACK 3. Select "PARAMETER" and 4. choose "BRIGHTNESS" this creates a new track to control the brightness of the light!
1. Select the BRIGHTNESS track and 2. RIGHT-CLICK and add a NEW KEY and input frame 0 simply CTRL+DRAG to copy this key frame or as I found out after this pic was grabbed you can CTRL click to input KEYFRAMES at the mouse cursor, see next step...
1. CTRL click a load of keyframes as shown, then 2. pull alternate points to vary the brightness of the light over time, make sense?? hope so :-)
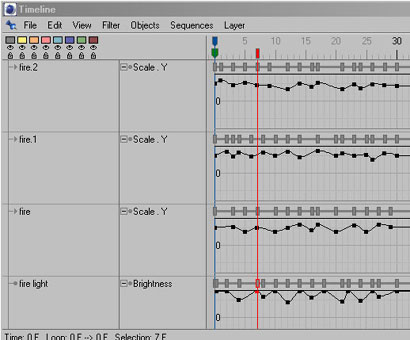
We are gonna do the same for the Vertical scale of the fire objects to help them flicker, 1. Select "fire" and NEW TRACK 2. PARAMETER 3. SCALE and 4. "Y" and again add a load of keyframes using CTRL and Click then vary the graph underneath, this will have the effect of scaling up and down the fire object over time...
Do the same for the other two fire objects, here we see each object, the light and the 3 fire objects and their keyframes/graphs, basically this gives an amount of randomness to each element, also by dragging a box around keyframes you can CTRL copy them further along to create more frames, I did this by making 30 frames then CTRL Copying them several times to fill the 90 frame animation!!
IMPORTANT POINT: 1, Select EACH fire object and 2. move its PIVOT to its base so that when they get scaled in the above steps, the fire scales up/down from its base rather then its middle!!
Click here to download 700kb(avi) example movie I also added an EMITTER and pointed it upwards, dropped a small CYLINDER into it and added the flame texture to it, this gives the effect of small bits of hot-ash rising from the fire as well, you could also add smoke in a similar way ;-) Hope you found this tutorial useful!! Author: Psionic3d.co.uk |
|
| Premium Partners | |||||
Free website templates and paid web templates are great tools to make your websites look perfect! You will save time and money with our flash templates and free website templates
Our visitors are satisfied with the quality of our free and paid website templates! Please visit our free website templates and paid website templates sections. We offer free web templates, free web layouts, free web page templates and other stuff for free download. All templates come with the html and external css file so you may easily edit HTML with your favorite HTML editor. Feel free to download our free web templates for your personal websites. Terms of use depend upon the website template vendor. |
Home | Submit Tutorial | Top Sites | Free Templates | Website templates | Privacy Policy | Contact Us |