Photoshop Tutorials, Flash Tutorials, 3Ds Studio Max Tutorials, Web Design Tutorials |
Home | Submit Tutorial | Top Sites | Free Templates (NEW) | Website templates | Privacy Policy | Link Exchange | Contact Us |
|
Welcome To ProDesignHost.com 3D Graphics Tutorials Area - Milkshape Basics - Software: MilkShape 3D3D Graphics Tutorial - Milkshape Basics
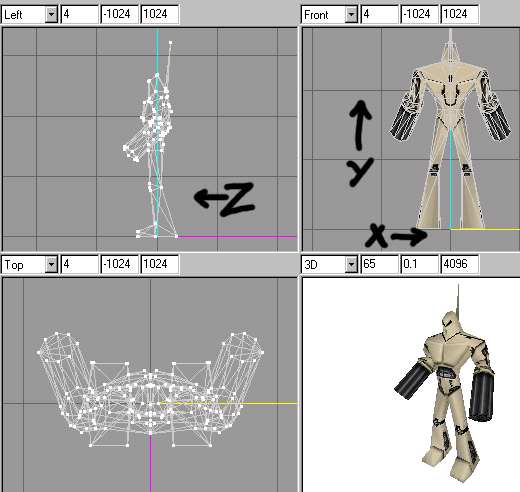
Click to enlarge AXIS EXPLANATIONThis is just a brief exlpantion of the different AXISsses :) OK, X is across(horizontal) and Y is up (vertical) like on a graph, Z is into/out of the screen in the front view, its forward and backwards relative to your model. When you move things you can restrict which axis are affected, like I disable Y (vertical movement) so when I move stuff it doesn't move up/down.  HIDING STUFFCTL H hides whatever is selected, CTRL U unhides all. When first using milkshape I found that when I selected vertices/faces I always selected the ones I wanted plus a load on the other side I didn't :) NOW I simply hide what I dont want affected, select the vertices that you dont want, CTRL H to hide em, now just work on the ones that are visible. I USE THIS CONSTANTLY!!!!. 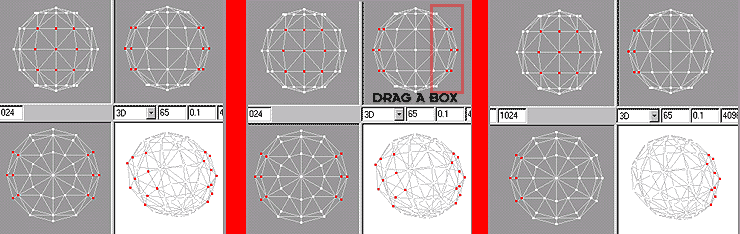
Click to enlarge SELECTING THINGSSHIFT LEFT CLICK adds to your selection, SHIFT RIGHT CLICK remove from your selection. OK when selecting stuff I also select too much, then remove the things I dont want by SHIFT RIGHTCLICKING and dragging a box around the stuff I dont want selected. In this example I select a load of verts, as you can see the front and back ones are selected. SHIFT RIGHTCLICK DRAG a box around the ones I dont want and that leaves the ones I do! I ALSO USE THIS CONSTANTLY!!! 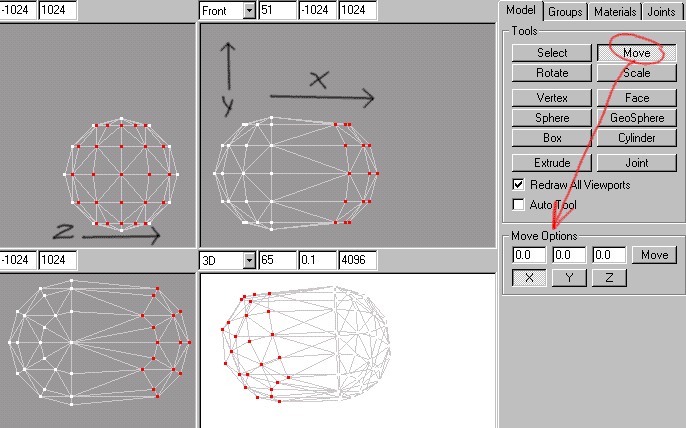
Click to enlarge MOVING THINGSSelect whatever you want to move, in this example I wanted to move the verts horizontally and definately not vertically, so in the move options I de-click Y and Z, leaving X restricting movement to that axis, easy eh? Wanna move something vertical only, declick X and Z and click Y, now you can only move up an down, useful for keeping things in line accurately. 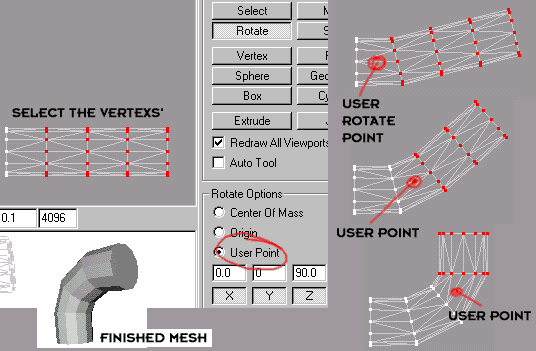
Click to enlarge ROTATINGSelect a load of verts, now Rotate but click USER POINT first, they will rotate around where you click and hold the mouse, extremely useful, otherwise you end rotating, then moving, rotating, then moving etc. In the example I created a cylinder, rotated the points, deselected some points rotate a bit more, deselect more points and rotate some more. 
Click to enlarge CREATING VERTICES AND FACESOne thing to remember when vertex modeling is to try and plan what your going to need, this is why its best to sketch your concept first and give it plenty of thought. OK now, in the example I have plotted a square with a circle within with the vertex tool, now I build the faces 1,2,3 clockwise or anticlockwise depending on which way you want the faces to face, check the 3d view to see your progress. Select the vertices on the circle and in the side view move them, giving the flat plane depth and as you can see you get a square changing to a circle :) 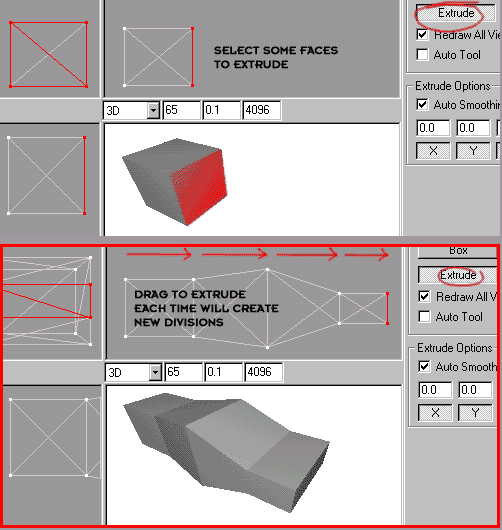
Click to enlarge EXTRUDINGSelect some faces as I have coloured in the example, the click the extrude tool, now in the side view drag the faces out, each time you do a new extrusion is created, now you can scale as you go along or simply select the vertices later and scale,rotate or move them accordingly. 
Click to enlarge TURN EDGEAs you can see the selected TWO triangles are joined by a line from one vertex to the other as shown, if we use CTRL E or click Turn Edge they will be connected by the other two vertices as shown in the second pic, a practical example is shown in the next pic.. 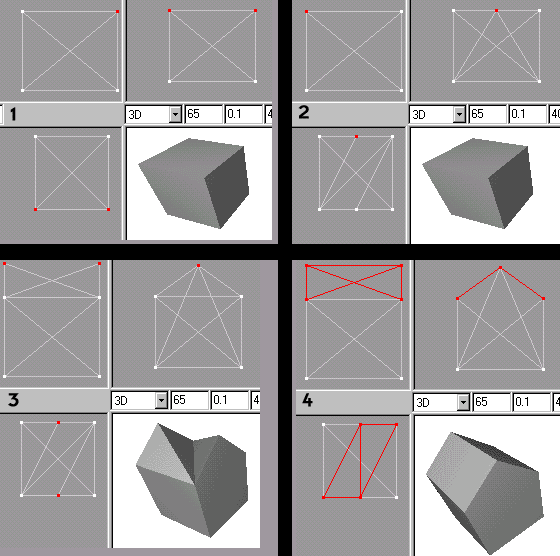
Click to enlarge DIVIDE EDGESelect two vertices and press CTRL P or click divide edge and it will create a new vertex inbetween them allowing you to add more detail where you need it. Also as you can see I drag the new verts upwards and we should have a house shape, but the faces are connected across the lower verts, select the two faces and CTRL E to turn edge now they are connected across the point of the roof. Woohooo! 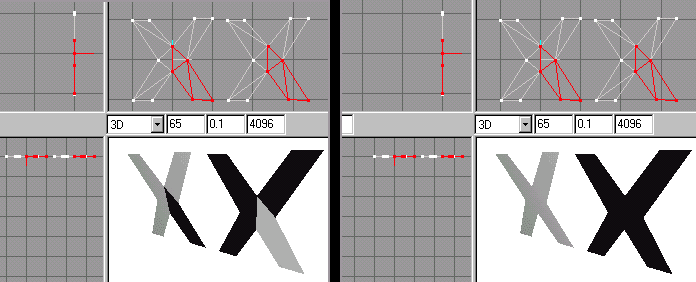
Click to enlarge REVERSE VERTEX ORDERI created some verts and also some faces but some are facing the wrong way as you can see the black faces are invisible in a model (holes) but there is a face there its just facing away from you :) So select the faces that are black and click FACE-REVERSE VERTEX ORDER in the menu up top, this will flip em round to the face the opposite way, very useful!. 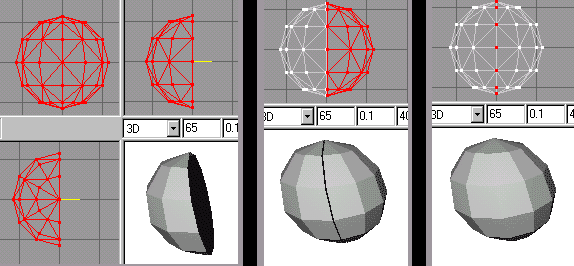
Click to enlarge JOINING TWO SIDESWhen modelling its more efficient to build one side of say a humanoid, then flip it for the other side :) So move your half right up to the center line of the vertical axis, (I didn't quite here, but that was for the example only) now select the group or all the faces and click CTLR D or EDIT-DUPLICATE SELECTION, you get a duplicate that is directly over the old one so you cant see it :) now click VERTEX-MIRROR LEFT>RIGHT and you get a mirrored copy. If it was slightly away from the centre line you will get a gap like mine, so move the other side inwards until the centre vertexs of each side are directly over each other, now select all the centre verts (from the front view) and click CTRL W or click VERTEX-WELD TOGETHER and all the centre verts will be welded. Check TOOLS-SHOW MODEL STATISTICS (before and after) and the vertex amount has gone from 74 to 62. Now select both groups and click regroup in the groups tab to make them an item! 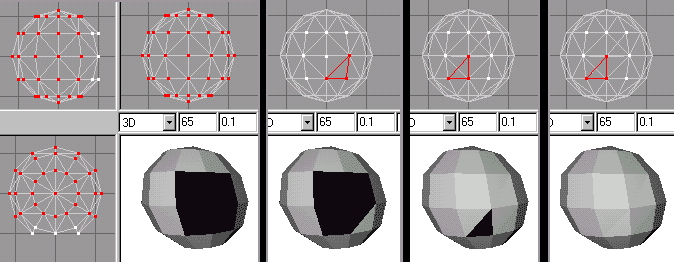
Click to enlarge FILLING IN A HOLEAs you can see we have a hole to fill, select all the vertices that are nothing to do with the hole and CTRL H to hide em, so they dont get in the way. from the front view, I added an extra vert in the centre and moved it into position. Now simply build the faces as before, if you build a face and its black then you went round the wrong way and its facing inwards, go click FACE-REVERSE VERTEX ORDER to flip it and build all the following faces in the opposite direction, ie if clockwise was wrong, build them all anticlockwise from now on. Sorted!!! 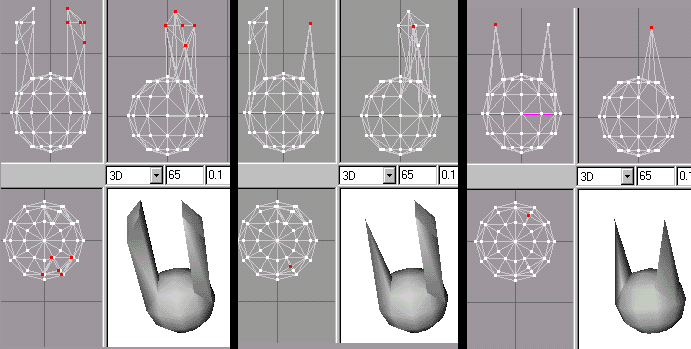
Click to enlarge SNAP 'N' WELDLets give this ball some horns :) I select some faces and extrud em upwards, now select all the verts at the top of one of the horns in tyhe front view, now click CTRL N and then CTRL W (just hold CTRL and press N,W) SNAP and WELD, select the verts in the top of the other and SNAP N WELD again. Snap brings all the selected verts together into one place, they all still exist so you weld them to create just a single vert at that point! Author: www.psionic3d.co.uk |
|
| Premium Partners | |||||
Free website templates and paid web templates are great tools to make your websites look perfect! You will save time and money with our flash templates and free website templates
Our visitors are satisfied with the quality of our free and paid website templates! Please visit our free website templates and paid website templates sections. We offer free web templates, free web layouts, free web page templates and other stuff for free download. All templates come with the html and external css file so you may easily edit HTML with your favorite HTML editor. Feel free to download our free web templates for your personal websites. Terms of use depend upon the website template vendor. |
Home | Submit Tutorial | Top Sites | Free Templates | Website templates | Privacy Policy | Contact Us |