 |
Photoshop Tutorials, Flash Tutorials, 3Ds Studio Max Tutorials, Web Design Tutorials |
 |
Home | Submit Tutorial | Top Sites | Free Templates (NEW) | Website templates | Privacy Policy | Link Exchange | Contact Us |
|
Welcome To ProDesignHost.com 3D Graphics Tutorials Area - The Zombie - Bones in CFX - Software: MilkShape 3D3D Graphics Tutorial - The Zombie - Bones in CFX
LOAD THE MODELI exported the zombie from milkshape as a MILKSHAPE ASCII.TXT file, ready to be imported into CFX. Then click Windows and choose Material editor, you should see a window popup like in the pic below...... 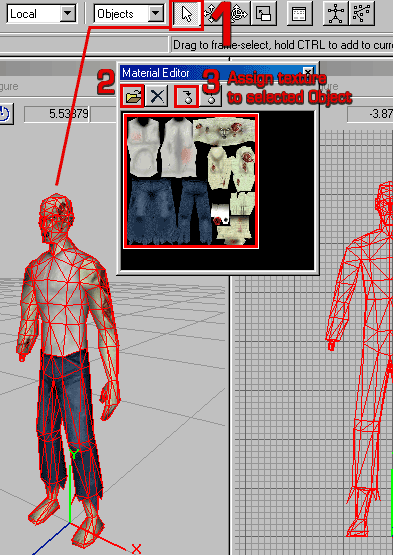 ASSIGNING THE SKIN1. click the Select tool and select the Zombie Mesh, 2. Click Open New Texture and find the zombie.jpg skin, and it'll show up in the Material editor window as shown, you can open several for multi texturing, anyway 3. Click the Assign Texture to assign mesh as shown, and your texture will show up on the model. CREATING THE CENTRAL BONESOK, Now this method is just my method at the moment, its not the best and I will change it to suit various models but for something simple like this, it'll do :) Click the BONES button on the top bar as shown marked in red and click in the front view to create BONE 1 at the base, then bone 2,bone 3 etc... THE bone 1 is so I can rotate the whole zombie and also its good reference for where the floor is. 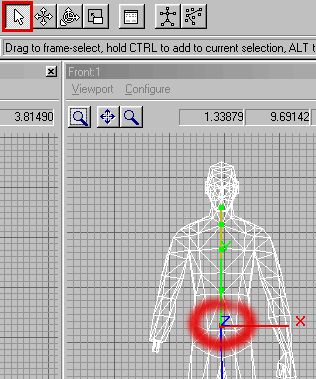 ADDING THE LEG BONESNow to create the leg bones, I select the SELECT tool and click the bone marked in red, this is where the leg bones will start as you can see in the next pic. 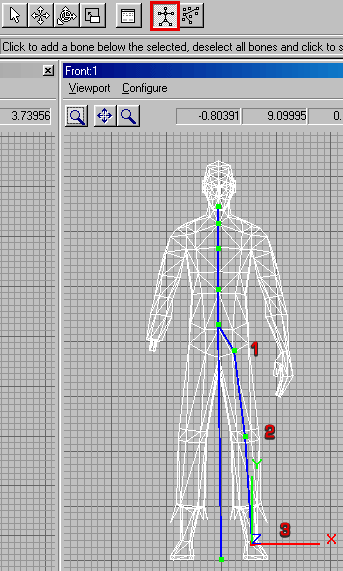 LEG BONESNow click the BONES button again as marked in red, and click 1,2 and 3 to create the leg bones. Now remember to CLICK select again to select the centre bone again, click the Bones button and create the leg bones on the other side. You must select a bone that NEW bones will be joined to(well you dont have to but in this case you do :)) SKELETONI created bones for the arms etc and in the side view I (clicked of Meshes as marked in red so only joints can be selected) moved the bones to match the mesh. make sure you tick meshes again after moving all the bones in the front/side views into the correct positions. Also worth a mention is (as marked in the top left) I change the coords to Local from World so things rotate about themselves etc. BIND THE SKINNow this is the time consuming part and its difficult to explain but I'll do my best with a few examples. First the easy bit click Skeleton>Bind Skin in the menu and your mesh will be attached to the bones. Now click the button marked red, to edit vertex assignments, and also right click it to bring up the options window as shown. Now when I clicked the head bone it showed me which verts were assigned but the ones marked red were assigned to a lower bone for some reason, anyway I selected that bone selected the verts I wanted UNASSIGNED and unassigned them, I then clicked the head bone again and clicked SELECT UNASSIGNED, this gave me the ones on the top of the head, I then ASSIGNED them and all the verts in the head are assigned to the head bone. Now if you go into Animation mode, you can rotate the head bone and the head will move (DONT FORGET TO UNDO AFTER TESTING IT) 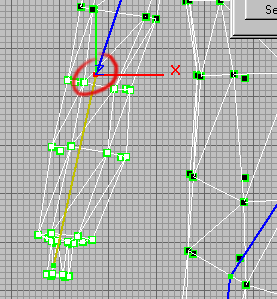 THE STUMPAs you can see in this pic the Elbow Bone has all the verts in the lower arm ASSIGNED to it, so this is OK, When we rotate the joint the whole forearm will move. 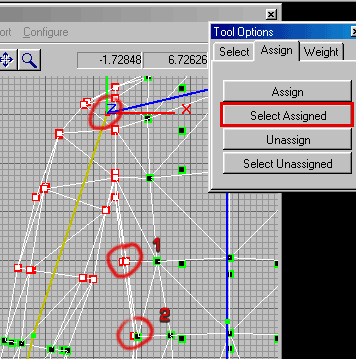 THE SHOULDERWhen I selected the Shoulder bone I could see that several verts in the body were also assigned to it, this means when the shoulder moves so will these verts creating weird stuff to happen in the body :) Check the next stage to see how to fix it 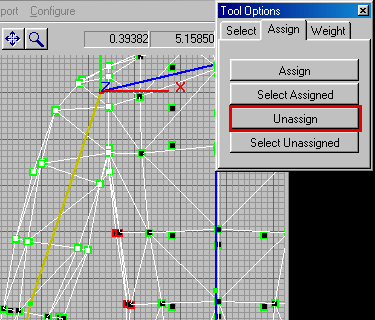 UNASSIGNINGI selected the bone and also seleted the verts that I wanted UNASSIGNED, using CTRL to add to the selection and ALT to remove from the selection, now I have them selected click UNASSIGN. 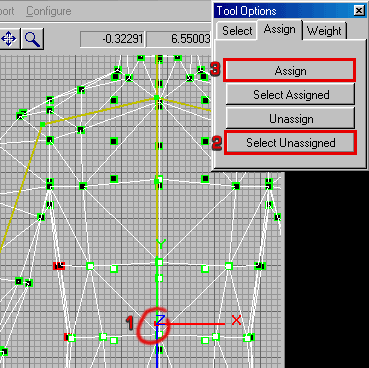 ASSIGNING1. I selected the spine bone which I want to assign those verts to instead of the shoulder, 2. click SELECT UNASSIGNED to select those LOOSE verts and 3. I ASSIGNED em to the spine bone instead. Basically the idea is to check each bone and make sure the correct verts are assigned to it, so it moves correctly, I constantly check in animation mode how things look by rotating something then UNDO-ing after seeing how its affected. 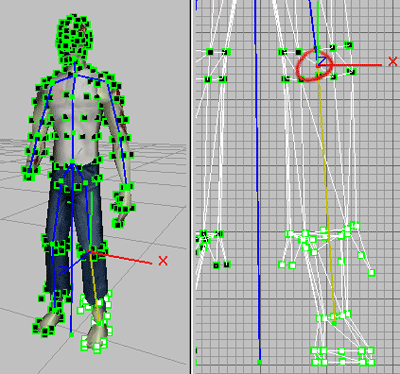 LEGI selected the leg and as you can see ALL the lower leg verts are assigned to it, but I want the foot verts assigned to the ankle bone so I can rotate the foot seperately. 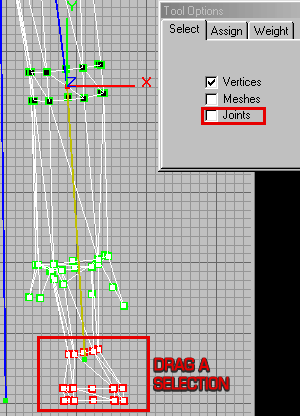 UNASSIGNINGI selected the knee bone and the verts in the foot (I unchecked joints so only verts can be selected for the moment) and UNASSIGN by dragging a selection box around the feet verts.. 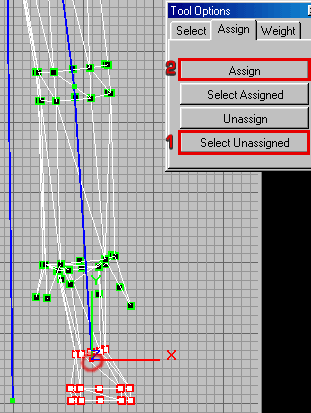 FOOT ASSIGNNow I select the ankle/Foot bone and 1. SELECT UNASSIGNED then 2. click ASSIGN to assign the foot verts to the foot bone, test it in Animation Mode by rotating and UNDO-ing :) ZOMBIE DANCINGI keep going through each joint and testing things in animation mode then Switching back to OBJECT mode and Unassigning/assigning verts until it all works right, and as you can see above the Zombie is trying open a door with his Stumpy hand or having a bit of a dance :) OK, I seperated this tutorial from the actual animation one cus I thought there was too much for one tutorial, the Walk cycle tutorial is next so look out for it very soon. Hope you found this useful! Author: www.psionic3d.co.uk |
|
| Premium Partners | |||||
Free website templates and paid web templates are great tools to make your websites look perfect! You will save time and money with our flash templates and free website templates
Our visitors are satisfied with the quality of our free and paid website templates! Please visit our free website templates and paid website templates sections. We offer free web templates, free web layouts, free web page templates and other stuff for free download. All templates come with the html and external css file so you may easily edit HTML with your favorite HTML editor. Feel free to download our free web templates for your personal websites. Terms of use depend upon the website template vendor. |
Home | Submit Tutorial | Top Sites | Free Templates | Website templates | Privacy Policy | Contact Us |