Photoshop Tutorials, Flash Tutorials, 3Ds Studio Max Tutorials, Web Design Tutorials |
Home | Submit Tutorial | Top Sites | Free Templates (NEW) | Website templates | Privacy Policy | Link Exchange | Contact Us |
|
Welcome To ProDesignHost.com 3D Graphics Tutorials Area - The Zombie - Uv Mapping - Software: MilkShape 3D3D Graphics Tutorial - The Zombie - Uv Mapping
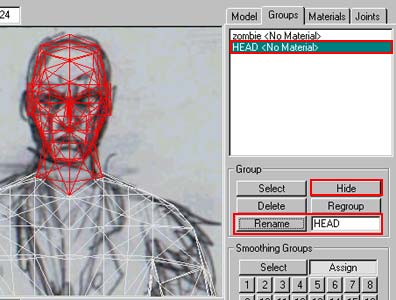 SELECTING AND GROUPINGTo start with I selected all the faces in the Head (please read my other tuts for tips on how to select things) Then I pressed REGROUP and re-named the new group HEAD as you can see, now Click HIDE because we dont want that bit in the way. I then did the same for the rest of the model, front torso, back torso, legs front, legs back, left arm, right arm etc. Selecting Faces, Regrouping and Renaming. 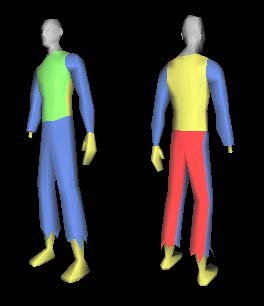 GROUPSI have applied some colours just to demonstrate how the groups I have broken it down into look.  MORE GROUPSI check it in all views in Wireframe and Flat to make sure all the groups are correct and we are now ready to open up Lithunwrap which you used to be able to get for FREE from LithUnwrap. IT HAS NOW MOVED AND BEEN RENAMED TO UNWRAP3D and a demo can be found at Unwrap 3D and it can be purchased for $29 (or about 20 quid here in the UK) the program hasn't changed that much so this tutorial is still pretty relevent :)  LITHUNWRAPNow its time to open up Lithunwrap, then go to File>model>open and open your uv.ms3d model up in here, and basically you get a blank screen with a little square in the top left corner..Cool! OK on the right side click the cross by Groups and it will expand to show all your groups as above no RIGHT CLICK ON materials and click ADD from the menu, we are going to add a simple checked pattern so we can see any stretching of the UV's on the model and hopefully try and fix em. 
Click to enlarge ADDING A MATERIALStage 1, rename the material to "check" then Double-Click to bring up the properties Menu, Stage 2, Click the maps TAB, Stage 3, Click the Map type and select checker (This is also where you would select Bitmap and load a bitmap as a texture) but for now we need a checker. Stage 4, Click the properties and the map properties menu pops up, in the next pic we will change the colours of the check and the tiling.....  SETTING COLOUR AND TILINGStage 1, Click colour one and choose a light blue, Stage 2, click colour 2 and pick a dark blue, I dont use black and white cus it makes my eyes hurt :) Just a personal preference plus the vertexs/faces dont show up on the white parts!!!!. Stage 3, after choosing the colours set the tiling to 8 (or 16 sometimes) this gives plenty of checks to help show up bad mapping later on....NOW click OK and click material once, then Click Check again and it should appear filling the screen!  ASSIGN THE TEXTUREStage 1, Click edit, Stage 2, Click Unhide all, this will as it says unhide all the faces, but because theres no UV's yet its all still bunched up in the corner, Stage 3 is to select the Faces button as shown, Textures can only be assigned to faces (or groups I think) and NOT vertices obviously.....Check out the next step to see how to assign the check to the model.. 
Click to enlarge ACTUALLY ASSIGNINGClick Select in the menu and "Select All" this selects all the faces in your model that you unhided (is that a word? :)) in the previous step. Now RIGHT CLICK on the check material to bring up the menu, and Stage 2, Select ASSIGN, this will assign the current material to all the faces (or groups) selected. As you can see in the preview window he has gone blue, he still hasn't got any UV mapping yet tho' were getting to that very soon.... 
Click to enlarge APPLY DECAL MAPPINGStage 1, Right Click "torso front" and click "Select" in the popup menu, this selects the group you want to apply mapping to. Stage 2, Click Tools>UV Mapping>Decal for simple flat planar mapping onto a simple-ish flat-ish surface, the front of the torso. Stage 3, click the button Z-front because we want it projected from the front onto the torso, Click OK and as you can see he now has some checks on the torso. 
Click to enlarge FIXING STRETCHING....PLEASE read the picture right to left on this one, sorry its just the way I did it :) As you can see in Stage one theres a bit of stretching on the tops of the shoulders, to fix it in Stage 2, I select the four vertexs (Changing to vertexs mode by clicking the vertex button to the left of the faces button I pointed out earlier) then in Stage 3, I dragged them upwards to expose the faces to the Front projected mapping, I'll try and explain in the next diagram!!!! 
Click to enlarge SOME THEORYOK, I'll try to explain why planar/decal mapping stretches or smears. In the first image above left imagine looking down on some faces that are curving away from where the mapping is being projected from. The faces that are at an angle only get a small portion of the mapping thats being aimed at it. In the second image above right, you have to imagine keeping the angled away faces the same length but rotating(or moving) them forward to face the oncoming image, you do this by moving the vertexs in vertex mode, I will try and show some more examples as they arise. Its basically like reverse origami :)))) you have to unfold things so they are flat and facing forwards, then when they are wrapped around the shape of the model you get stretch free mapping.....most of the time! My advice is start on something much simpler than this model.... 
Click to enlarge THE BACKHere I selected the back group (if you right click on it in the right hand list you will see that in the menu AUTOHIDE is clicked, this hides all the other groups allowing you to work on just one at a time) I applied DECAL mapping again but chose "BACK" as the direction this time. The red areas I have highlighted, were very close because they were facing almost side on to the projection, so I selected all the vertexs and dragged them outwards so the faces are facing the oncoming image....well they will be when we get there :) SAVE your model as you go along as well, and choose MS3D format as well. ALSO worth mentioning is that holding SHIFT while selecting adds to the selection!! and holding CTRL while dragging a selection box removes from the selection, Check you have the right faces/verts selected by checking the 3D Preview in wireframe mode. 
Click to enlarge THE HEAD - SPHERICAL MAPPINGNOW its gets tough :) I usually have to exoeriment with getting the head mapping right and its probably a better idea to break it down into smaller goups, like face, top head, back and sides, neck, ear, this makes it easier to map each area but for now in Stage 1, I applied SPHERICAL mapping, with axis alignment "Y" (I had to try the others until this one worked its a bit of guesswork) also Space Poles ticked and I applied it. Stage 2, the two vertical edges I have marked are where the front seam of the face joins, I found out by sleecteing some faces as shown and seeing what shows up in the 3D view! Now, I would prefer the center seem to be in the middle so it makes painting the face more natural, so in the next step I am going to select the left half of the face and move it over to the right so the two seems are touching, that way the other seam will be on the back (less noticeable) 
Click to enlarge DA BUTTONS...As you can see here I have selected the left half of the head, moved it so that is was on the right and lined up the seems (zooming in to be accurate) and now you can see the head mapped and you can almost make out the facial features in the centre!!! I thought I'd mention the little buttons up the top as well just to explain about them. 1. The select and move button, Also by Pressing "S" you can scale the selection by dragging the corner boxes. You should be in this mode most of the time. 2. The Move View button, use this to pan around your view, especially when zoomed in. 3. The Zoom button, click and drag to zoom in or out of your view. 4. The Zoom Area button, drag a box around the area you want to zoom into. 5. The Vertex Mode button, using this allows you to manipulate the vertexs (always drag a box around each vertex as there are usually two or more on top of each other) YOU cannot ASSIGN A MATERIAL when this button is pressed. 6. The Faces Mode button, this allows you to select and move faces, also SHIFT adds to the selection and CTRL removes from your selection, same applies to the other modes. you can ASSIGN MATERIALS TO SELECTED FACES 7. The Group Mode button, this allows you to select whole groups! you can ASSIGN MATERIALS TO SELECTED GROUPS (I think :)) . 
Click to enlarge BOX MAPPINGFor the feet I applied Box Mapping, seperated and spaced as shown, then I selct parts and see whatthey apply to in the 3D view as shown. Box Mapping is basically planar from the front,back top,bottom and two sides, and you could probably map the head or other parts using it fell free to experiment :) I will move bits that are the same over the top of each other flipping them vertically/horizonatally or rotating if needed. I want each foot to receive the same mapping on this model so thats why they will be over the top of each other I will show you the layout in the next pic. 
Click to enlarge THE FOOT LAYOUTAfter laying each piece over its equal, I began to lay them out, always watching the 3d view. We now have the Side view, the sole underneath, the top and front above and the back of the ankle to the right, I moved them all into position and scaled them to fite nice and neatly to save space, this also helps when laying out all the pieces later on. Again, Box mapping can be used for many areas! 
Click to enlarge THE LEGSI applied Decal Mapping to the front of the trouser group and as you can see the area marked "A" is streching because the faces are side on to the projection. To fix it I selected the vertexs watching carefully in the 3D view (using wireframe flat mode) that they were the correct ones and as you can see on the area marked red on the left I have pulled the vertexs out to the left showing the faces that were previously at 90 degrees to the projection. When you look from the other side of the model the outer leg is fixed as you will see in a later screenshot.  CYLINDRICAL MAPPINGFor the stump of bone sticking out of the zombies' broken arm I applied cylindrical mapping. The faces Marked "1" are the faces around the sides of the protruding bone and the faces marked "2" make up the cap on the end of the bone. Also useful for arms and legs sometimes and even faces, it all depends and you have to experiment to find out which AXIS' works, I never get it right first time :) 
Click to enlarge BOX MAPPING THE ARMI sometimes use Cylindrical mapping on arms/legs etc but not this time. I only really discovered this method while writing this tutorial :) I applied box mapping to the arm and it gave me four sides and the top of the shoulder, so I selected a strip and checked which one it was in the 3D view (Wireframe Flat mode again) then I selected the faces which were next to it in the 3D view, moved them alongside and moved the vertexs to overlap the ones along the other edge. I did the same for the others, so we end up with the round, cylindrical arm layed out flat. the faces marked "1" are the inside of the arm faces I havent moved the vertexs to match the the faces to the right of it yet, just thought It would illustrate my point. The area marked "2" is the faces on top of the shoulder, I will move the that in as well later so the correct vertexs are overlapping!  ALL DONE...NEARLYI have Decal mapped the back of the trousers, Box Mapped the hand and thats it!!! Check out the pic to see that the checks cover the whole model, I also changed it from 8x8 tiling to 16x16 just to give a little more detail on the checking. 
Click to enlarge UNHIDE AND THE MESSWhen you go to Edit>Unhide All it shows you all your groups on screen at the same time, usually its even messier than this :) but I scaled stuff down a bit as I went along, you must go through each group (Change selection to group mode) and scale them all down (press "S" to scale) so they roughly fit on the square. Now its time to see which bits are important like the head, etc and make them larger, moving groups around and scaling them to fit as efficiently as possible. I cannot explain this part its just experimentation.  EXPORTINGOnce you have layed all the groups out as best you can goto File>UV Map>Save to save the UV template ready for painting over, as you can see above I have chosen a 512x512 skin for this one and filled lines to mark the groups faces! 
Click to enlarge THE TEMPLATEHeres the exported template, now when you paint over this and Apply it to the model in Milkshape or in Lithunwrap if you like you should see your details mapped onto your model. The next tutorial will cover some basic 2d painting techiniques. Hope you found this useful cus it took bloody ages to write :) Author: www.psionic3d.co.uk |
|
| Premium Partners | |||||
Free website templates and paid web templates are great tools to make your websites look perfect! You will save time and money with our flash templates and free website templates
Our visitors are satisfied with the quality of our free and paid website templates! Please visit our free website templates and paid website templates sections. We offer free web templates, free web layouts, free web page templates and other stuff for free download. All templates come with the html and external css file so you may easily edit HTML with your favorite HTML editor. Feel free to download our free web templates for your personal websites. Terms of use depend upon the website template vendor. |
Home | Submit Tutorial | Top Sites | Free Templates | Website templates | Privacy Policy | Contact Us |