Photoshop Tutorials, Flash Tutorials, 3Ds Studio Max Tutorials, Web Design Tutorials

Home  |  Submit Tutorial  |  Top Sites  |  Free Templates (NEW)  |  Website templates  |  Privacy Policy  |  Link Exchange  |  Contact Us

Recommended Hosting:
Host Unlimited Domains on 1 Account
1500GB storage and 15000GB bandwidth for $6.95/mo!
Recommended Hosting:
Host Unlimited Domains on 1 Account
1500GB storage and 15000GB bandwidth for $6.95/mo!

Welcome To ProDesignHost.com Flash Tutorials Area - Simple Preloader

In this toturial, you're going to learn how to create buttons and

apply simple Actions to them to jump to certain keyframes.

To ease this, we're going to use simple drawings for the buttons.

Once you get the basic idea behind creating buttons, you can

start drawing some cool buttons like these:

1:

Let's begin this by drawing the button.

Select the Rectangular Tool and draw the shape you desire, as Fig 1 for example.

image01
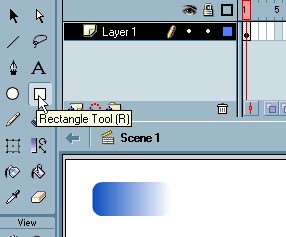
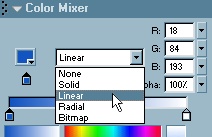
Fig1

To get the rounded shape on the corners of your rectangular button, select the image02 tool (Round Rectangle Radius) and apply the corner radius value before you draw the button.

Use the color mixer to apply "Linear" color to your button if you like.

image03

2:

We're going now to convert the shape we drew into a Symbol. That is, making the shape behave as a button.

  • Select your object on the stage and press F8 (or go to Insert>Convert to Symbol)
  • Select "Button" as the Behavior, and name the Symbol "button1" as shown in Fig 2

image04
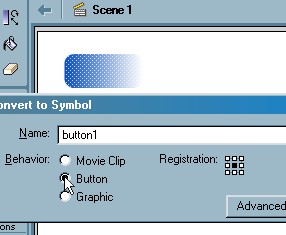
Fig 2

3:

To save time and effort, when creating more than one button, press F11 or go to Windows>Library and dublicate your button. (Right-click as shown in Fig 3).

image05
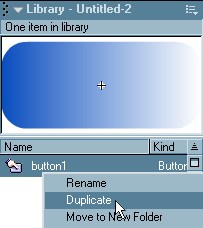
Fig 3

To avoid any conflicts between the dublicated buttons, rename the second button to "button2" the third to "button3" and so on. Dublicate as needed, and rename in accordance.

In this tutorial we are going to use 3 buttons.

4:

  • Create additional layers by clicking on the image06 icon. For now, create 3 layers as shown in in Fig 4.
  • Select the first frame of Layer 2 and drag "button2" from the library to the stage. Select layer 3 and do the same for "button3".

image07
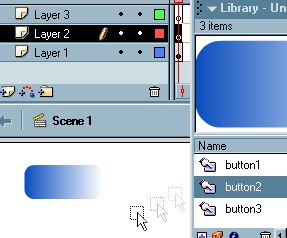
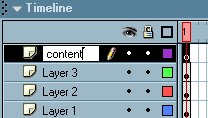
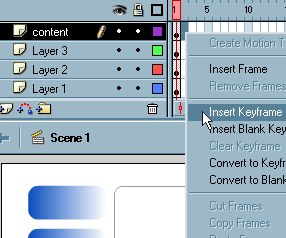
Fig 4

Tip: Naming your layers and distributing different object into different layers is important. This can be very helpful in terms of flexibility and ease of future modifications with huge projects.

5:

  • Add a new layer, name it "content". This layer is going to hold your contents to be displayed when different button are clicked.
    We are going to distribute different contents to different keyframes.

    image08
  • Select the first frame of the "content" layer and draw a rectangular-shaped frame next to your buttons, as an area to display the contents.
  • Right-click frame 2 of the "content" layer and select "Insert Keyframe" as shown in Fig 5. (Repeat this for the 3rd and 4th frames.)

    image09
    Fig 5
  • Right-click on each of the created keyframes for the "content" and select Actions.
  • Add a "stop();" action to each. You can find the stop action under Actions>Movie Control>Stop.
  • Click on the first keyframe of the content layer and go to the properties bar. Lable your keyframe with a name.

image11

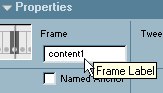
I labled mine content1, do the same for content 2, 3 and 4

These names are going to be as a way of ditinguishing the different content keyframes, thus telling the buttons to jump to a certain keyframe as required. Keyframe numbers can be used as well.

6:

  • Select the 4th frame of "Layer1" "Layer2" and "Layer3", righ-click and select Insert Frame.

image12
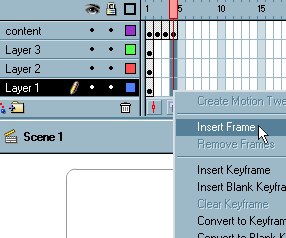
Fig 6

In doing this, we are allowing the buttons to be visible throughout the whole animation process, you don't want your buttons disappear when the 5th keyframe is selected ;)

7:

In this step, we're going to customize the buttons.

Normally, with every button, there are 3 major states with regards to the location and the action of the mouse pointer:

  • Up: This keyframe is responsible for defining the state of the button normally when no action is applied to it by the mouse pointer. (The original -ideal- shape of the button)
  • Over: This keyframe is responsible for defining the state of the button when the mouse pointer is over your button.
  • Down: This keyframe is responsible for defining the state of the button when the button is clicked.
  • Hit: This keyframe is responsible for defining the area of the button that is effective to the mouse pointer.

image12
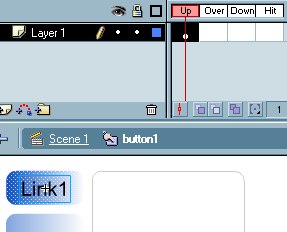
Fig 7

This means, u can right-click each keyframe of the above and select "Insert Keyfram". Modify each keyfram as you desire, change the color of the button when "over", for example.

Note: Type the title of the button on the"Up" keyframe using the Text tool.

8:

In this step we're going to add the Actions to the buttons.

  • Right-click on button 1 on the stage and select Actions.
  • Add the actions as shown in Fig 7, the "goto" action can be found under Actions>Movie Control>Goto.
  • Now right-click on the second button and add the same action ,but make sure you change the frame to "content2"
    The same for the third button, and "content3" for the frame.

image13
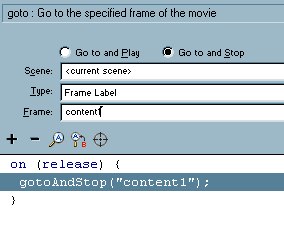
Fig 8

You are ready to test your movie! but wait...

once you click on button1 or button2, how are you going to tell whether it has actually jumped to content1 or content2? Don't forget to add some content to your contents keyframes!

Practice, practice and practice! you can create advanced buttons with multiple actions within minutes!

Conclusion:

What we did:

  • Drew a rectangular-shaped object.
  • Converted it to a button.
  • Dublicated the button and renamed to avoid conflicts.
  • Draged the dublicated buttons to the stage.
  • Distributed the buttons to separate layers (you can have them on the same layer as well, but it's more flexible to have them on different ones)
  • Created a new layer for the content.
  • Each content on a seperate frame with a "stop" action.
  • Labled each keyframe with a unique name.
  • Added actions to the buttons to go to the contents respectively.
  • tested the movie!

Well done :)

Download *.fla
Author: AEvision
Advertisements

Premium Partners

  Free Website Templates - Flash templates, Affordable Website Design, Website Templates, Website Redesign, Custom Website Design, Web Design Tutorials, Flash Tutorials, Promotion Tutorials - that is what we do. Metamorphosis Design Studio offers quality, free and low cost web site templates for your business and personal life, we also offer affordable web design and site re-design.
  Vertex Website Tempales - It saves tones of time and money to use pre-made web designs to build your web site. You need a web site but you don't want to pay thousands dollars to professional web design companies? Our web templates is just for you! They are designed to be easilly edited by your favorite html editor, like MS FrontPage
  Website Design Tutorials - Web site design is an area that simply takes experience to perfect. Get started with these tutorials covering everything from page layout to content tips. At Webdesigntutorials.net you will find all the Web-building tutorials you need, from basic HTML and XHTML to advanced Adobe Photoshop, Macromedia Flash MX and 3D Studio Max software.
Free website templates and paid web templates are great tools to make your websites look perfect! You will save time and money with our flash templates and free website templates Our visitors are satisfied with the quality of our free and paid website templates! Please visit our free website templates and paid website templates sections. We offer free web templates, free web layouts, free web page templates and other stuff for free download. All templates come with the html and external css file so you may easily edit HTML with your favorite HTML editor. Feel free to download our free web templates for your personal websites.

Terms of use depend upon the website template vendor.

Home  |  Submit Tutorial  |  Top Sites  |  Free Templates  |  Website templates  |  Privacy Policy  |  Contact Us

All Right Reserved by ProDesignHost.com