Photoshop Tutorials, Flash Tutorials, 3Ds Studio Max Tutorials, Web Design Tutorials |
Home | Submit Tutorial | Top Sites | Free Templates (NEW) | Website templates | Privacy Policy | Link Exchange | Contact Us |
|
Welcome To ProDesignHost.com Flash Tutorials Area - Philter's Flash_XML TutorialFlash and XML In the current age of technology, with all of the cool toys and gadgets that are available, all of these things exist for one purpose...to allow us to more easily access information. Today, we are able to acquire information more quickly and easily than we has ever been possible in the past. Largely, this has to do with the internet and the fact that you can access information anywhere in the world from anywhere else in the world in literally the blink of an eye. So we all know that the information is there, waiting for us to access it. The challenge we as developers face is how to get that information to the user. Up to this point, the information has largely been sitting in static HTML pages, just waiting to be read. The problem with this is that there is more work involved in changing or updating that information as the editor has to know HTML, CSS, etc. So recently, more and more information has moved from static pages to being stored in some "data repository". The most common is the relational database. The great thing about this is that the data is kept seperate from the layout, so you can change the data without having to deal with design issues. All you need is to have a server-side scripting environment (i.e., ColdFusion, ASP, PHP, CGI, etc.) to extract the information from the database and display it for the user in HTML format. This is a wonderful system, however, since each relational database management system (RDBMS) is proprietary to a degree, it can require quite a bit of work for different databases to communicate with each other (plus you need to know the different server-side languages to deal with all of this, along with SQL). Wouldn't it be nice if there was a standard way of transferring information that was platform and language independent? Enter eXtensible Markup Language (XML). XML is a buzzword that has been thrown around a lot lately and for good reason. XML has been positioned as the STANDARDIZED way to transfer information that has been recommended by the W3C. This means that any application can potentially communicate with any other application as long as they communicate via this language. In a way, it's kind of like the Universal Translator they have in Star Trek. Each species speaks a different language, but that language can be transmitted via the translator in a way that each party can understand the others as long as the translator has the algorithms necessary to make sense of that language. This is the entire premise behind Web Services, which you will be hearing a lot about in the future. Essentially, XML is a way to describe information in a structured way, that is human readable. Though I will go into a very brief explanation of XML, for more detailed information, here are a few excellent resources discussing XML: � A technical
introduction to XML XML is strictly a language that DESCRIBES the information itself, unlike HTML which describes how the information should appear in a web browser. XML makes use of tags, just like HTML, however, the tags are used as descriptors of the data itself, instead of how the data should be laid out on a page. Thus, the person writing the XML is allowed to make up his/her own tag names and structure those tags in a way that gives context to the information contained within them. Here is a simple HTML element consisting of tags: <p>Phil Chung</p> This code tells me that the browser should display "Phil Chung" as an individual paragraph, but tells me nothing about whether "Phil Chung" is the name of a Flash developer, a flesh-eating disease, or a clothing manufacturer. Take a look at the following, however: <flashDude>Phil Chung</flashDude> This XML is a little more descriptive than the HTML in that it tells me that "Phil Chung" is somehow related to "flashDude". What if we take this a step further: <flashDudes> The wonderful thing about this is that we can understand something about the information just by reading this XML. "Phil" is the first name of the first Flash dude in a list, and "Chung" is his last name. Notice that the syntax is very similar to HTML. However, XML is much more strict in the fact that every XML document must be WELL-FORMED (must comply to strict rules), or an error is thrown, unlike in HTML where a code mistake will not prevent the browser from displaying your page. In order for an XML doc to be well-formed, it must:
The other great thing about XML is that it is just text, so it can be written with any text editor, such as NotePad. Ultimately, because XML is a standard language, information can be stored once in one format and viewed through a variety of different presentation formats (HTML, Flash, even PDF). After gaining a basic knowledge of XML, we now turn to Flash to address the question..."As a Flash developer, why should I care about any of this XML stuff?" Starting with Flash version 5 (and continuing with MX), Macromedia has seen the importance of XML in the grand scheme of things and has incorporated an XML parser into the Flash player. Essentially, a parser takes in information and converts it to a format that the native application can understand and deal with more easily. In Flash's case, the XML parser loads the external XML document (as one long text string), runs through all of the nodes (XML elements) and converts them into an object structure. Then, using Actionscript, we can extract the information we need and display it appropriately. There are some issues to understand before working with XML in Flash:
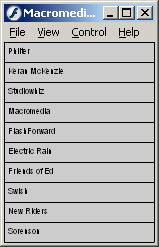
Fortunately, if you're working in Flash MX, you don't have to deal with the slow parsing issue or the whitespace issue (MX includes a property that can be set so that the parser ignores whitespace - see below). This tutorial is written for Flash MX, so it will not directly deal with these issues. Ok...now that we've got that out of the way, let's get started actually looking at the XML in Flash.In the remainder of this tutorial, we'll build a simple dynamic menu in Flash where the menu items (and associated information) will be drawn from an XML file (keep in mind that this is being done in Flash MX). Here is the menu below (doesn't look too fancy, but you'll see that all of the menu items are entirely dynamic). We will write the XML, load the XML into Flash, then deal with the parsed information to create a menu. To create the XML content, do the following:
Notice that each menu item has it's own element. The information for each menu item is contained in ATTRIBUTES. The 2 attributes are "name" and "url" and each has a different value for each menu item. As you can see, we're trying to set this up in a way that the data is structured in a logical way. By no means is this the only way to do it. However, you should make note of how the data is organized because you will need that information when it comes time to extract and display the information in Flash. You could also have set it up like this: <?xml version="1.0"?> This time, we used only one attribute (url) and we placed the name as simple text inside of the myItem element. This provides essentially the same information as the first example, but does so in a slightly different way. As you can see, XML is very flexible in a way that allows you to store and structure your information in a way that is best suited to the type of information you're dealing with. For this example, we will be using the first XML example I gave. Though this menu is very simple, it can be very easily expanded upon to build submenu items and such. Now onto the Flash movie. In your Flash movie, do the following:
That's it! Now test your movie (making sure that your fla/swf file is in the same location as your xml file in this case) and viola, it should work. This is the bare minimum code you need to make this work.
Now let's go through the code line by line to see exactly what is happening (again, remember that this code is written in and for Flash MX, and all parts of it will not work in Flash 5). menuXml = new XML(); This line creates a new instance of the XML object and attaches the name "menuXml" to it. After this, if you want to refer to your XML object, you can just refer to the instance name you set. You HAVE to do this if you want to work with XML in Flash. menuXml.ignoreWhite = true; Next, we use the "ignoreWhite" property of the XML object and give it a value of true. This tells Flash to ignore the whitespace in your XML document (see discussion on white space above). This property is only available in Flash player 5r41 or higher. menuXml.load("myMenu.xml"); Skipping right down to the bottom for now, we use the "load" method of the XML object which accepts one parameter - the path to the XML file you want to load. Since the XML file is located in the same directory as our fla/swf file, we just have to tell it the filename. Now we come to the bulk of the code...the part that actually does stuff with the XML information once it has been loaded and parsed in Flash. Again, let's break it down line by line: menuXml.onLoad = function(success) { The XML object has 2 event handlers associated with it: onData and onLoad.
The "onLoad" handler is an empty function. Basically, that means that when the "onLoad" event occurs, by default, nothing will happen, unless you tell it to do something. The way you tell it to "do something" is by assigning a callback handler to it. The callback handler is just a function that you write that contains the code you want to execute once that particular event occurs. You can assign a callback handler (function) in one of 2 ways. If you are only going to use the function once, you can just assign it as in the example above (using an unnamed function). menuXml.onLoad = function(success) {stuff goes here;} If you want to reuse the function, you will want to create a named function and assign that function to the handler. Notice here that when assigning the callback handler, we write "myCallback" instead of "myCallback()" because we are not executing the function with this line of code, we are just assigning the function to the "onLoad" handler. function myCallback(success) { stuff goes here; } menuXml.onLoad = myCallback; Now, back to our example. You may have noticed that the callback function contained a parameter called "success". This is a parameter that is set to either "true" or "false" depending on whether the XML was loaded and parsed successfully. This is handy because now we can test the value of the "success" parameter and either do what you want with the information (if it is available), or tell the user that the XML did not load successfully. We do that in our next line: if (success) { This line says to only execute the following code if "success". To put it another way, this is exactly the same as saying "if (success == true);" but we save ourselves a little typing. Next, we begin to extract the information... menuItem = this.firstChild.childNodes; First, I need to find my way through the XML object structure that the Flash player has so kindly parsed my data into. If you look back at the XML structure we created, you see that we have as our root element "<myMenu>", and that element contains 4 "child" elements called "<myItem>". Any element that is nested inside another element is considered a "child of that "parent" element. The nested elements also have a "sibling"relationship to each other. These are terms that are commonly used to describe the relationship between elements in XML, and is used by Flash as well. So the important elements (which I will refer to as nodes from here on in) are the "<myItem>" nodes. These nodes contain the actual information I need to build my menu. To access these nodes, I say "this.firstChild.childNodes". There are 3 parts to the path stated here:
We take this information and store it in the variable "menuItem" so we can reference it later on without having to type "this.firstChild.childNodes" over and over again. for (var i=0; i<menuItem.length; i++) { In order to extract all of the information we need, and then build the menu, we have to be able to loop through and extract information from each of the "<myItem>" nodes (i.e., the "name" and "url" data). You can do this several ways, but in our example, we'll use a "for" loop. This type of loop consists of 3 parts:
So this loop will allow us to extract information beginning with the first element in the array (remember arrays begin at index 0) to the last element in the array. item = _root.attachMovie("itemClip", "itemClip" + i, i); With each node (array item), we first dynamically attach the movie clip we created to the stage using the "attachMovie" method and store it in a variable called "item". Again, this allows us to reference the attached movie clip without having to write the path to that clip every time. The "attachMovie" method takes 3 parameters:
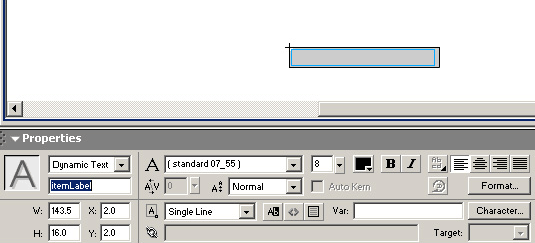
So, for every "<myItem>" node in the XML file, a new movieclip is attached to the stage. item._x = 0; This sets the "_x" property (position of the clip on the stage in x direction) to 0, which is the very left edge of the stage. item._y = 20*i; This sets the "_y" property (position of the clip on the stage in y direction) to a different value depending on what the value of "i" is. By multiplying "i" by 20, the menu items will cascade vertically, and will be offset 20 pixels from the previous item. item.itemLabel.text = menuItem[i].attributes.name; Next, we want to extract the "name" attribute from the "<myItem>" node to display it in our dynamic text field. We can do that by using "menuItem[i]" to find the current node (array item). So in our example, menuItem[0] would represent the first "<myItem>" node. We then use the attributes property, and the "name" attribute specifically to extract that information. After extracting the information, we have to display it in the text field somehow. In Flash MX, text fields are treated as objects and can now have instance names (whereas in Flash 5 you had to use a variable name). To insert text into the text field, we will use the "text" property of the text field ("itemLabel" was the instance name). And since the text field is inside of the movie clip, we use the path "item.itemLabel.text". item.myUrl = menuItem[i].attributes.url; The other piece of information we need is contained in the "url" attribute. We can access this the exact same way as the "name" attribute, just replacing "url" for "name". Then, we are just going to store this for now in a variable I called "myUrl" which is located in the movie clip. The last thing that needs to be done is to create the action so that when the user presses one of the menu items, a new browser window will open with the url we've set. However, notice that we have not created a button symbol yet (and we will NOT be creating one at all!). In Flash MX, movie clips are equipped with pretty much all of the same event handlers as buttons have. Not only that, but the event handlers do not have to be attached to the specific movie clip (or button) in Flash MX. You can dynamically set an event handler in much the same way as we did with "onLoad" earlier...by using a callback handler. item.onRelease = function() { Here, we'll use the "onRelease" handler of the "item" movie clip that we just attached. We assign this to an unnamed function. This is great because by placing this code here, we no longer have to hunt around in our Flash movie to find the appropriate button or movie clip. We just have to look in frame 1 of the root timeline! getURL(this.myUrl,"_blank"); The final thing we have to do is tell Flash what to do when the "onRelease" event occurs. This is a simple "getURL" command that tells Flash to open the url "this.myUrl". This is just calling on the variable "myUrl" that we created earlier which contains information from the "url" attribute of our XML file. Then, after we end the appropriate functions, for loops, and if statements using "{", we're done. This menu is generated dynamically via the XML data. Don't believe me? Export the swf file, then go back to your XML file and add or remove one of the "<myItem>" nodes. Then, reopen your swf file and see what happens :) Obviously, this is a very simple example. However, you can expand this concept to create very elaborate XML driven Flash front-ends. Here are a couple of examples: This is a Flash interface that extracts information from a publicly accessible news feed created by Macromedia and allows you to sort it by several different categories, all of which are described in the XML document. A Flash interface that reads news feeds in RSS format (an XML implementation). This brings in news feeds that have been syndicated from various sources (mostly blogs) and provides a Flash front end to these news items. Downloads & More Author: studiowhiz.com/
|
|
| Premium Partners | |||||
Free website templates and paid web templates are great tools to make your websites look perfect! You will save time and money with our flash templates and free website templates
Our visitors are satisfied with the quality of our free and paid website templates! Please visit our free website templates and paid website templates sections. We offer free web templates, free web layouts, free web page templates and other stuff for free download. All templates come with the html and external css file so you may easily edit HTML with your favorite HTML editor. Feel free to download our free web templates for your personal websites. Terms of use depend upon the website template vendor. |
Home | Submit Tutorial | Top Sites | Free Templates | Website templates | Privacy Policy | Contact Us |