|
1. Create a new document with the following properties:
Width: 1.8 inches
Height: 3.5 inches
Resolution: 300 pixels/inch
Color Mode: RGB Color 8 bit
Background Contents: Transparent
|
|
 |
2.
Use the Rounded Rectangular tool with the following properties to draw
a rectangle from the top left corner to the bottom right:
Radius: 50 px
Color: Black
|
|
 |
3. Add a Bevel and Emboss layer style (Layer> Layer Style> Bevel and Emboss) with the following properties:
Style: Inner Bevel
Technique: Smooth
Depth: 100%
Direction: Up
Size: 5 px
Soften: 0 px
Angle of Light Source: 120�
Use Global Light: Checked
Altitude of Light Source: 30�
Gloss Contour: Linear
|
|
 |
4. Duplicate the current layer (Ctrl+J) and change the fill color of the new layer to white. |
|
 |
5. With the new layer selected, use the Transform tool (Ctrl+T) to apply the following properties:
Width: 82%
Height: 90%
|
|
 |
6. Use the Transform tool (Ctrl+T) again but to apply the following properties:
Reference Point: Top Middle (
 )
)
Height: 30%
|
|
 |
7.
Ensure that the rulers (View> Rulers) and snap (View> Snap) are
enabled . Create four guides by clicking on the ruler and dragging them
to the boundaries of the current layer. |
|
 |
8. Delete the current layer (Layer> Delete> Layer). |
|
 |
9.
Use the Rounded Rectangular tool with the following properties to draw
a rectangle from the top left corner of the guides to the bottom right
corner of the guides:
Radius: 10 px
Color: Black
|
|
 |
10. Add a Bevel and Emboss layer style (Layer> Layer Style> Bevel and Emboss) with the following properties:
Style: Outer Bevel
Technique: Smooth
Depth: 15%
Direction: Down
Size: 3 px
Soften: 6 px
Angle of Light Source: 120�
Use Global Light: Checked
Altitude of Light Source: 30�
Gloss Contour: Linear
|
|
 |
11. Use the Elliptical Marquee tool (M or Shift+M) with the following properties to create a selection of a circle:
Feather: 0 px
Anti-alias: Checked
Style: Fixed Size
Width: 1.25 in
Height: 1.25 in
|
|
 |
12. Create a new layer (Shift+Ctrl+N) and fill the selection with black on the new layer. |
|
 |
13. Duplicate the current layer (Ctrl+J). |
|
 |
14. With the new layer selected, use the Transform tool (Ctrl+T) to apply the following properties:
Width: 40%
Height: 40%
|
|
 |
15.
Load the selection of the top layer (Ctrl+click on the layer
thumbnail), select Layer 1 and press delete to clear the area in the
selection. |
|
 |
16. Delete the top layer (Layer> Delete> Layer) and deselect the selection (Ctrl+D). |
|
 |
17. Add a Color Overlay layer style (Layer> Layer Style> Color Overlay) to the current layer with the following properties:
Blend Mode: Normal
Color: #0080ff
Opacity: 10%
|
|
 |
18. Add a Gradient Overlay layer style (Layer> Layer Style> Gradient Overlay) with the following properties:
Blend Mode: Normal
Opacity: 15%
Gradient: Black to White
Reverse: Unchecked
Angle: 120�
Scale: 100%
|
|
 |
19. Create a new layer (Shift+Ctrl+N) as the top layer. |
|
 |
20. Use the Polygon Lasso tool (L or Shift+L) and create a triangle selection of the top right corner. |
|
 |
21. With the new layer selected, fill the selection with black. |
|
 |
22.
Load a selection from the bottom layer (Ctrl+click on layer thumbnail),
select inverse (Shift+Ctrl+I), select the top layer and press delete to
clear the area in the selection. |
|
 |
23.
With the top layer selected, add a Color Overlay layer style (Layer>
Layer Style> Color Overlay) with the following properties:
Blend Mode: Normal
Color: #0080ff
Opacity: 15%
|
|
 |
24. Add a Gradient Overlay layer style (Layer> Layer Style> Gradient Overlay) with the following properties:
Blend Mode: Normal
Opacity: 75%
Gradient: Black to White
Reverse: Unchecked
Style: Linear
Align with Layer: Checked
Angle: 120�
Scale: 150%
|
|
 |
25. Move the top layer above the bottom layer and change the blending mode to Screen.. |
|
 |
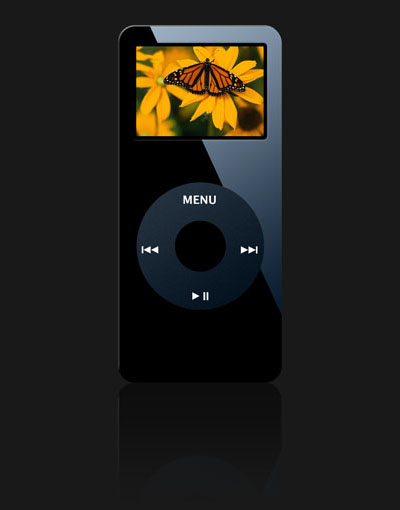
26. Now we'll place a photo inside the LCD screen. Open the image (Ctrl+O) that you want to add. |
|
 |
27. Use the Image Size tool (Image> Image Size) to resize the width to 400 pixels. |
|
 |
28. Create a selection of the canvas (Ctrl+A) and copy to clipboard (Ctrl+C). |
|
 |
29.
Switch back to the iPod Nano document. Load the selection Shape 2
(Ctrl+click on layer thumbnail) and contract the selection by 5 pixels
(Select> Modify> Contract). |
|
 |
30. Paste into selection (Shift |
|
 |
31. Select the top layer and add an Add Noise filter (Filter> Noise> Add Noise) with the following properties:
Amount: 6%
Distribution: Uniform
Monochromatic: Checked
|
|
 |
32.
Now we are going to create a reflection for a sense of space. Use the
Canvas Size tool (Image> Canvas Size) to apply the following
properties:
Relative: Checked (Apply this property first)
Width: 0.5 inches
Height: 0.5 inches
Anchor: Center
|
|
 |
33. Use the Canvas Size tool (Image> Canvas Size) again but to apply the following properties:
Relative: Checked (Apply this property first)
Width: 0 inches
Height: 1 inches
Anchor: Top Middle
|
|
 |
34. Select the canvas (Ctrl+A), copy merged (Shift+Ctrl+C), paste (Ctrl+V) and move the new layer to the top. |
|
 |
35. Flip the current layer vertical (Edit> Transform> Flip Vertical). |
|
 |
36. Use the Move tool (V) to move the current layer below the iPod Nano. |
|
 |
37. Change the opacity of the current layer to 50% and add a layer mask (Layer> Add Layer Mask> Reveal All). |
|
 |
38.
With the layer mask selected, use the Gradient tool (G or Shift+G) to
create a gradient with the following properties from the bottom of the
iPod Nano to the bottom of the document:
Gradient: Black to White
Style: Linear
Mode: Normal
Opacity: 100%
Reverse: Unchecked
|
|
 |
39. Use the Text tool (T) to add text to the wheel. These are the characters & fonts used:
Menu: MENU (Lucida Sans, 8pt)
Rewind: 9 (Webdings, 8pt, scale height 50%)
Forward: : (Webdings, 8pt, scale height 50%)
Play: > (Lucida Console, 9pt);
Pause: ; (Webdings, 9pt)
|