 |
Select Software Tutorials |
 |
|

|
|
 |
|
 |
|
Welcome To ProDesignHost.com Photoshop Tutorials Area - Animated Ad Banner
We will be creating a standard sized banner, which
is 468x60. So start a new document File->New,
you can type in the width and height yourself, or you
can select "468x60 Web Banner"
from the "Preset Sizes" drop
down options.
The first thing we want to do is create a 1px
border around the banner.
- So Create a New Layer and name it "Border"
- Press CTRL+A to select all. Then go to Edit->Stroke.
Apply the following Settings:
Width: 1px. Color:
Black. Location: Center. Blending
Mode: Normal. Opacity: 100%
This gives us a crisp 1px border around our banner.
Now, every other layers we create through the tutorial
will need to be placed beneath this border layer on
the layers pallete, this is to make sure the border
will always be visible.

|
Now, the design of the banner itself is really up
to you, the important thing about this tutorial is the
animation technique which I will show you later, but
you can read on if you want to follow this tutorial
and make a similar banner to mine.
I will be creating a banner to promote tutorialwiz.com,
so i'll include its logo for branding purpose. So I
open up my
logo and copy and paste it into my banner,
and resize it down to fit the banner. Now I use the
eclipse shape
tools and create a large round shape to
right. This is where my promotion text will go. You
will need to make it larger than the banner size so
it has a nice curve in the middle.
|
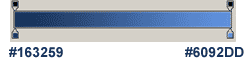
Now I want to give it some color, so I apply some
gradient to it, go to Layer->Layer Style->Gradient
Overlay. I used the default settings, with
the following colors:
I also applied some drop shadow and inner shadow using
all the default settings, just change the opacity down
to 20%

|
I used the rounded corner shape tool and created
a shape underneath my logo for my tag line. Applied
a gradient layer style with the following colors.

Then I applied a 2pixel white stroke to it. (Layer->Layer
Style->Stroke)
I also added a grey to white gradient to the background
layer so it doesnt look too flat.

|
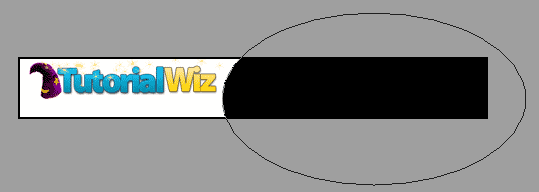
Now theres my banner design (yes, its simple, but
thats all we need really..). Now comes the fun part.
Animation.
To make the tutorial simple, I will rotate only between
2 lines of text, you should then get a fairly good idea
of what to do, then you can apply it to create more
text rotations.
- Use the type tool, and create your
first text (one that will appear in the first frame.

- Now hide
the text layer . then use the text tool
again, and type your 2nd line of text, in the same place
as your first text.
Now you should have the following in your layers pallete:
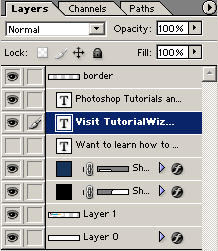
and the banner look like this:
 |
Now we are ready to animate it, lets switch to Image
Ready. In photoshop, just click the "Switch
to Imageready" button.
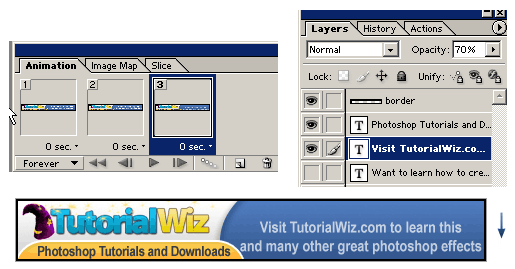
In imageready, you should see a pallete at the bottom
that looks like this

|
Now click on the "New Frame" icon (indicated
above), this will duplicate the selected frame and append
it to the animation.
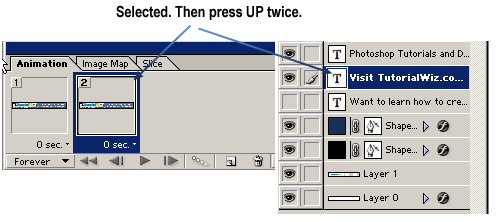
Now with the 2nd frame selected, select the visible
text layer from your layers pallete and shift it up
by 2 pixel (press UP arrow twice).
|
If you take a look at your first frame, and 2nd frame,
they are slightly different.
Now duplicate the last frame, then use the DOWN arrow,
and move the text layer down by about 10 px, and set
the layer's opacity to 70%
|
Now duplicate the last frame, move the text layer
down by about 15px, and set the layers opacity to 40%

|
Duplicate the LAST frame.
Now hide the current visible text layer, and make the
other text layer visible, move the text layer down to
about the same position as the other text layer was,
and set its opacity to 40%

|
Then Duplicate the last frame.
Now use the UP arrow / or your mouse, and move this
text layer UP by about 15px and set its opacity to 70%

|
Then duplicate the last frame.
Now move the text layer UP by about 10 px and set its
opacity to 100%

|
Then duplicate the last frame.
Now move the text layer DOWN by about 2px.

|
Now repeat from STEP 8 above to make this layer go
down and the other text layer go UP again.
If you done everything correctly, you should have around
14 frames.
At the bottom of each frames, you will see "0
sec.", this is the time delay between each frame.
We want to set ALL of these to "0.05" OR
"0.1", any, depends on how fast you want it.
Experiment :).
To set this to 0.05, click on the down arrow next to
"0 sec", and choose "Other", then
enter 0.05
|
At the bottom of the animation pallete, there is
a control panel, with some buttons like one found on
your DVD player, click > to play the animation.

As you can see here, the texts are cycling so fast
we cant even read it. But there is 2 frames that we
want it to stop at, and the animation will make it look
like its sliding in and out.
Select Frame #1 and set it's delay to 2 seconds. Now
find the other frame where the other text is in the
position to read, (mine is at frame #8), and also set
that to 2 seconds.
Now, look at our animation :)

|
I just want to point out that this tutorial was to
show you how to create animated banner, the designs
and style, you should come up with your own (better
than mine of course). Remember NOT to over do it as
animation can chew up alot of KB as you create more
frames and more movements.
If you had any problems following this tutorial, CLICK
HERE to download my PSD and see how I did
it, and maybe change a few things to use for your site. |
|
|
